by Sandy McCauley | May 15, 2008 | Mask, Outlining Images

Well, I finally looked it up today and it has a VERY useful purpose! As you know, in KNK Studio, you can create an outline (shadow mat) using Tranform>Outline. Up on the Smart Bar, you will find an icon on the far right which you can indent for masking or outdent to leave off. Masking, in essence, is used for creating a single welding outline when there is more than one image selected. With the Masking off, the outlines will remain individual. That’s it!
Lynn G reported another related discovery this morning: if you initially have only selected one object for the Transform>Outline but then click on other images, the outline will be applied to each one.
by Sandy McCauley | May 15, 2008 | KNK, PDF
Here’s a question I get at least twice a week: How do I tell if my PDF file is raster or vector after I import it into Klic-N-Kut Studio?
Answer: Great question!
And here are some general guidelines I use to figure it out:
(1) Select the image and go to: Arrange>Break Path. If it’s grayed out, then you definitely don’t have a pure vector image. It’s either raster or a hybrid.
(2) If you double click and it brings up the Accuscan window, then another good sign it’s a raster. Go ahead and try tracing it.
(3) If you double click and see nodes, you pop open a bottle of champagne… it’s a vector pdf! lol
(4) If you double click and it brings up the Group Viewer, then you go to Layout>Ungroup. Click away so that nothing is selected and start over. If you STILL get the Group Viewer, then it’s a hybrid and dealing with those is going to take a video or two! Which I promise to make and they will be free due to the source of the samples I’ll be using 😉
by Sandy McCauley | May 13, 2008 | Measure Tools, Notes
This is a BIGGIE for those of you who design files to share or sell to others. Definitely take note (and pardon the pun, in advance)!
There is a Notes function in Klic-N-Kut Studio which allows one to add text labels and instructions to files that will then be ignored by the cutter. I always appreciate designers adding that information directly into a file so that I don’t have to keep extra .txt or .doc files with my cutting files AND the information is right there on the screen. I ALSO love it when users will include the name of any font they used in their file in case I want to use that same font to further create items for my project.
To use the Notes function, click on the Measure tools icon, on the Tools Toolbar and it’s the last icon on the right. Up on the smart bar you will be able to type the text you wish to add in paragraph form. You can change the font, font size, font style, etc by clicking on the Fonts button. ALSO: Be sure to use a common font like Arial or Times New Roman so that anyone else opening your file won’t need YOUR special font installed. Otherwise, they will receive an error message and be required to pick a substitute font before the file will open.
After typing your notes, just click on Close and your notes will appear as an item you can move around on your screen just like any other text object, except it won’t be a cuttable object. You can even change the color of the text from the Shop Palette and resize it by dragging a selected corner. If you’ve purchased any of my videos or watched the demo, you will see that I’ve used the Notes function at both the beginning and end of each video! 🙂
Be sure to check out some of the other useful features under the Measure Tools… you can also add notes with arrows pointing to a particular location or easily add dimensions to your fold-up template projects. This really adds a very professional look to your work!
by Sandy McCauley | May 11, 2008 | Anchor Nub


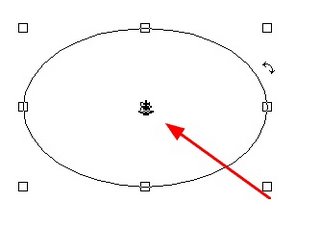
I heard from a KNK Studio user today who wanted to know how to get rid of some weird icon in the middle of her selected object. I immediately knew the solution as this has come up before.
Note the first diagram above shows the weird icon which will appear in the middle of your selected object instead of the small square. The reason this appears is due to clicking on the anchor nub up on the Smart Bar (see the second diagram). Normally, you will have one of the 9 little squares selected and whichever one you pick then provides the x, y location for that same corresponding square in your selected object. Note that as you click on different squares in that little diagram at the top, your x and y values will change.
Now, suppose you want to move your object to some location on the Sign Blank and you actually want some specific spot ON your object to be located at some x,y position. That’s where the anchor nub comes in. You can move your anchor to any location on your object (an example is shown in the third diagram), then type in the x, y values up on the Smart Bar, and your object will be moved so that the anchor is at that location.
Why would we, as paper crafters ever need that? I’m not really sure! lol Maybe one of you will come up with an application! I’m sure, since this software was derived from a CAD program, then this feature has a usefulness in that industry! But for now… just know that if you see that “weird icon” show up, it’s as simple as clicking on a different spot in your little diagram on the Smart Bar to eliminate it. 🙂
by Sandy McCauley | May 10, 2008 | Axis Swap, Comparisons, File Import
One of the most confusing issues for new users of KNK Studio is what to do about the Axis Swap setting under Cut>Plotting Defaults. And to add to the confusion, that setting works differently in regular KNK Studio versus KNK Studio GE.
For users of regular KNK Studio, you control Portrait vs Landscape cutting by having that parameter checked or unchecked. In my video on “Understanding the Sign Blank”, which was created over 6 months before GE was released, I instruct the user to make sure Axis Swap is checked in order to have a Portrait orientation when cutting. If a Landscape orientation is needed, then UN-check that box.
However, GE was devised to work like RoboMaster and Wishblade Advance. You control the Portrait vs Landscape orientation from within Layout>Blank Size. Simply check whichever one you want. And under Cut>Plotting Defaults, leave Axis Swap UN-checked ALL the time.
Another recommendation involves opening .knk files from other users. Because the owners of KNK cutters have larger cutters, it’s not unusual to open up 12″ x 12″ layouts and some of the settings from that user’s KNK Studio will be sent with this file. To avoid having so much to verify or having to troubleshoot why your file won’t cut as it should, use File>Import versus File>Open when loading these files. You will retain YOUR Sign Blank settings! And, to keep the same image sizes, just left click once when you see the “L” cursor appear, rather than dragging your mouse to create a box. For some projects, it’s often important to keep the exact dimensions that the designer used.


