by Sandy McCauley | Aug 29, 2009 | Rhinestones

My good friend, Jenn the Hacker, truly outdid herself with this stunning creation that once again shows us that she’s truly an artist. (Click on the photo for a larger view!)
Jenn, thank you from the bottom of my heart for sending me this beautiful card and giving me the okay to share with everyone. The rhinestones are from Scrapbook Die Cutter and while she chose to glue them onto the cardstock, I’m sure they can also be ironed, just like one would do if applying them to fabric. I’m eager to try that out myself now that I have the inspiration from Jenn to use them in my paper crafting!
If you’d like to see more of Jenn’s creations, her blog is located at:
http://just4funcrafts.blogspot.com/
by Sandy McCauley | Aug 14, 2009 | Free Videos, Rhinestones

In today’s video, I show how to easily design a pattern using two different sizes of rhinestones. In the figure above, the blue circles are sized for a 3mm stone while the red circles are sized for a4mm stone. I use the Transform>Outline function to create several inline paths but NOT to fill the entire letter, as you can see above. I also show how to use color differences to easily select paths and circle for executing the Fit Object to Path and also for determining the number of rhinestones needed for the design.
I want to give credit to Luis, a member of the T-Shirt Forums, for his well-written and interesting tutorial using Corel for rhinestone designing. This was the inspiration for what I did today. Luis actually used a much larger inline size and I also really liked the look of that as well. Below shows a screen shot somewhat like Luis’s final pattern except I believe he uses much larger rhinestones for the interior.
Anyhow, fun stuff! Happy cutting!

by Sandy McCauley | Aug 8, 2009 | ACS, Eagle, Falcon, KNK, MAXX, Rhinestones
I want you to know about two new Digital Die Cutters now being sold by Accugraphic Sales: the 15″ ACS Falcon with 1200g of cutting force:

and the 24″ ACS Eagle, with a WHOPPING 1500g of cutting force!

I haven’t previously mentioned them because I’ve been busy completing the User Manual for these two new machines and introducing rhinestone applications to the KNK world. But now I’m ready to add the ACS to the line of cutters that I sell on commission with Accugraphic and note that I will be providing the same high level of technical support for ACS Systems that I give to my KNK customers, with additional hours of free training to help make the customers successful:
(1) Setup and installation and learning to cut, by phone/VNC… up to 90 minutes long
(2) Additional phone/VNC classes, whenever you need them, to cover any additional ACS topics of interest. Please refer to Current Specials, as well as, the Comparison Charts to see what each cutter package includes.
(3) You receive a certain number of the KNK Studio videos I sell in my store for free – again please refer to Current Specials, as well as, the Comparison Charts to see what each cutter package includes.
(4) I have a Yahoo group for my own customers called I Love KNK… you get invited to join that group
(5) I’m typically available 7 days a week by email, so you can always email me privately with any questions and I’ll respond within 24 hours… although usually MUCH sooner than that! : )
(6) And, finally, I help my customers with any designing needs… you get stuck on a file… you can just email it to me and I’ll tell you what you need to do.
These cutters come with ACS Studio and 10 rhinestone fonts. The software is dongled and contains an extra rhinestone designing feature (compared to KNK Studio) for filling images in any of 6 pattern choices.
If you visit Accugraphic’s site, www.knkusa.com, you’ll see that they are also now offering the current KNK Maxx models, packaged with the new ACS Studio, for those customers primarily interested in using the Maxx for rhinestone applications.
Please feel free to comment or post questions here OR send them to me privately at smccauley45@cox.net. If you decide to purchase a cutter from either KNKUSA (ScrapbookDieCutter) and want my support package, then please notify me in advance of your purchase, and I can let Accugraphic know you will be my designated customer.
I’m really excited to be expanding my horizons with these new cutters and helping those who will be using them in both business and hobby activities.
by Sandy McCauley | Jul 24, 2009 | Fit Object to Path, Free Videos, Retreats, Rhinestones, Stenciling

Well, as usual, I have a customer to thank for an AMAZING idea! Kaylene asked if we could use the Stencil tool under the Shapes menu to create some patterns for rhinestone applications and the answer is, “You becha!” This will open up even more possibilities for creating unique and interesting patterns to fill your shapes or even just letters. The video shows just a few examples. The important thing to remember with this tool, is that you need to weld the shape after you leave the Stencil Smart Bar to remove the stenciling lines. Otherwise, it’s a very easy process!
Thanks, Kaylene!
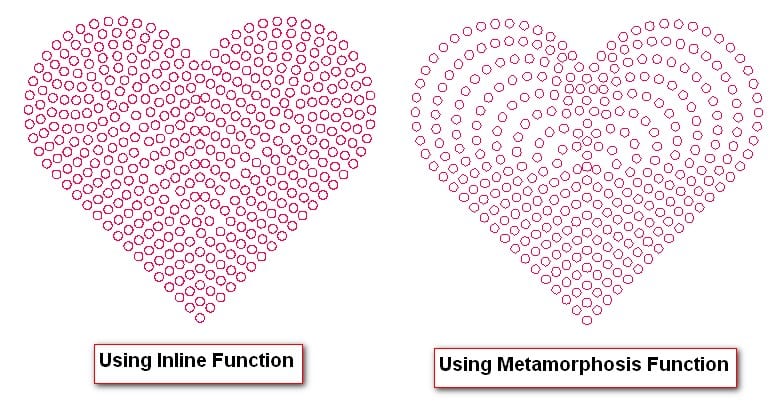
by Sandy McCauley | Jul 16, 2009 | Fit Object to Path, Free Videos, Hearts - Designing, Metamorphosis, Rhinestones

In the previous post, I show how to use Transform>Inline in KNK Studio to create a fill pattern for rhinestone applications. In today’s video, I show how to use Transform>Metamorphosis, which is perfect for symmetrical designs, such as a heart, a flower, a sun, etc. This is how I did my own T-Shirt design in the orginal, “Rhinestones, Baby!” post from last week. It’s both interesting AND fun to try both and then decide which look you like best. I have to again thank, Gerti, for asking how to create nesting shapes for today’s video, too! If I hadn’t revisited the Metamorphosis function to answer her question on June 28, then I wouldn’t have thought to extend this same application to rhinestone pattern designs! Thanks, Gerti!
by Sandy McCauley | Jul 14, 2009 | Fit Object to Path, Free Videos, Outlining Images, Rhinestones

There are several ways to fill a rhinestone pattern using KNK Studio. The video I have for you today shows how to use Transform>Inline to create a series of progressively smaller inlines to then use in aligning circles along a path. Then we use the same Transform>Fit Object to Path to get the circles aligned along the circles. You will need to tweak the locations of the circles to get the perfectly look, but again it’s just a case of shift them around with your mouse and adding/deleting as necessary. : )


