by Sandy McCauley | Jul 6, 2010 | Borders, Cuttlebug, Free Files

If you are a collector of the Cuttlebug border embossing folders, then you are going to LOVE Judy’s latest project and free gift to all of you. She has created cutting files to be used in conjunction with Cuttlebug embossing folders to produce greeting cards with cut edges to follow the contours of the Cuttlebug embossed borders. The cards can be folded to either produce regular side opening or top/bottom opening cards OR center opening as shown below.
There is a PDF tutorial included to explain how to create the cards, photos of the embossing folders, and (of course) the cutting files themselves. All you need are your digital die cutter, Cuttlebug embossing folders, and a Cuttlebug (or machine that will press Cuttlebug folders).
To download, please select from the following three formats:
Judy’s Cuttlebug Embossing Borders in KNK Format
Judy’s Cuttlebug Embossing Borders in AI Format
Judy’s Cuttlebug Embossing Borders in SVG Format
Thank you, Judy, for your time and effort in creating these files for the Cuttlebug owners! And thank you, Kylee, for suggesting this idea to Judy.

by Sandy McCauley | May 26, 2008 | Borders

While digital die cutters can do some very intricate cutting, it can be difficult to cut a precise 12″ border from a 12″ long sheet of cardstock. However, here’s a method that insures you get a complete border cut from your cardstock every time.
Before I get started on the method, note that the dimensions used are for a Klic-N-Kut. However, the exact same process will work with any other cutter. Just realize that you do need a mat at least 15″ in length.
In KNK Studio, create a Sign Blank that is ~13.5 – 14″ in length. The width can be whatever you like, just as long as it’s wider than the width of your border. 🙂 Create your border to be 13″ long. Now, depending on which cutter you own, you may need to switch to Landscape mode by either using Axis Swap or changing under Layout>Sign Blank or by rotating your image. This tutorial assumes you already know how to cut front to back, versus left to right with your particular cutter in the KNK Studio software.
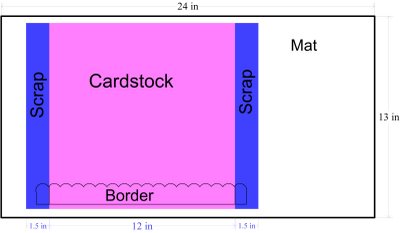
Place a strip of scrap cardstock (shown as blue above) at the start of your mat, then align your 12″ long good cardstock (shown as pink above) next to the scrap, followed by another scrap (again, shown as blue). The plan here is to start the cut on the first scrap, continue the cut through the good cardstock and then end on the other scrap.
When you are ready to cut your border, make sure your blade origin is over the first scrap and ~1/2″ from the start of your good cardstock. Work in Page mode (Cut>Plotting Defaults, change from Sign Blank to Page and click on Save Defaults or it can be turn on in the Cut Preview window (fourth icon from the right). This tells the cutter to start the image at the set origin.
Then click on the Scissors to cut and you should have your 12″ border. As always, you might want to test draw with your pen holder first just to make sure you have the steps down pat! 🙂


