Page 16 - Klic-N-Kut User Manual
P. 16
The installation of the front and rear tables on your KNK is best done with two people. Each box contains 2
identical tables (front and rear) and a supply of screws.
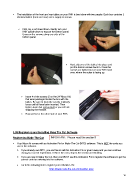
First, lay a soft towel down. Gently turn your
KNK upside down to expose the bottom panel.
Unscrew the screws along one side of the
bottom panel.
Next, slip one of the tables into place and
put the bottom screws back in. Once the
screws are tightened, turn your KNK back
over, where the cutter is facing up.
Insert 4 of the screws (5 on the 24” Maxx Air)
that were packaged inside the box with the
tables. Be sure to keep the screws relatively
loose until all have been inserted. Then
tighten down but not too tight or you will risk
stripping the threads.
Repeat this for the other side of your KNK.
1.09 Registering and Installing Make The Cut Software
Registering Make The Cut IMPORTANT: Please read this section!!!
Your Maxx Air comes with an Activation Pin for Make The Cut (MTC) software. This is NOT the code you
use in the software.
If you already own MTC, you are free to sell this Activation Pin or give it away and you can continue
using your current registration. If this is the case, skip to the section on Installing.
If you are new to Make the Cut, then you MUST use this Activation Pin to register the software to get the
correct code for entering into the software.
Go to the following link to register your Activation Pin:
https://www.make-the-cut.com/register.aspx
16