Page 14 - Klic-N-Kut User Manual
P. 14
Blade Installation
The blade must be carefully inserted into the blade holder. Do this over a soft surface (e.g. over a hand
towel). It’s important to protect the fragile blade!
The little springs that come with the blades are easy to lose, which is another reason to do this over a towel
so that a dropped spring doesn’t roll off the table. Remove the colored cap from the blade and slide the
spring over the sharp end of the blade:
Spring is placed over the blade
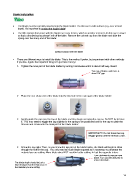
There are different ways to install the blade. This is the method I prefer, but experiment with other methods Step 1. Push
if you like. Again, the important thing is to just take it easy! inwards so that
blade can be
Tighten the main part of the blade holder by turning it clockwise until it is about half-way closed: inserted.
Turn top of holder until there is
about 1/8” gap
Place the non-sharp end of the blade into the tiny hole in the main part of the blade holder:
Gently guide the cap over the top of the blade and then begin screwing the cap on. Do NOT try to force
it. You may need to wiggle the cap slightly for the spring to be positioned and for the cap to catch the
threads and screw onto the main part of the blade holder:
IMPORTANT! Do not force the cap.
Wiggle gently until the threads catch.
Screw the cap tight. Then, as you screw the top part of the blade holder, the blade will begin to show
through the hole in the cap. You only need as much blade exposed as is necessary to penetrate the
material you are cutting. More blade does NOT result in better cutting. In fact the opposite is true.
Turn clockwise to expose more Step 1. Push
blade. Turn counterclockwise to inwards so that
retract the blade.
The blade depth should be just a blade can be
tiny bit longer than the thickness of inserted.
the material you are cutting.
14