Page 21 - Klic-N-Kut User Manual
P. 21
Go to your Applications folder and hold the Ctrl key while clicking on the MTC icon. Choose Open from
the drop-down menu.
Enter the registration number you received when you registered the software.
If you lose your registration number and you need to install MTC onto another computer, please go the
same link where you first downloaded MTC and click on “Recover Pin.”
1.11 Verify Communication and Test Draw Shapes
New owners tend to be VERY eager to try out their KNK. It’s also important to test your cutter to ensure that
data is being sent properly from your computer to the cutter. The following steps will allow you to do some
testing with the pen tool. But note that the following steps are for DRAWING, not cutting. Before inserting
the blade tool into your KNK, please read the following Sections: 1.05, 1.06, 1.07, and 2.01.
1.11.1 Setup for Communication Test and Drawing
Press an 8.5” x 11” sheet of paper to the mat. If your mat has no adhesive, then use tape to firmly attach the
paper to the mat surface. Note: Do NOT use this method when you begin using the blade. You must spray
your mat with adhesive so that when shapes are cut, they will remain attached to the mat.
While the paper can be placed anywhere on the mat, it is recommended that the paper be placed so that the
wheels will pass over the edges of the paper. This prevents adhesive from the mat sticking to the rollers.
You can also put down strips of scrap paper where the wheels are travelling to protect them.
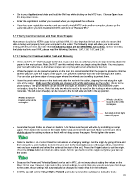
Raise the pinch wheel levers in the back and slide the mat into the cutter, aligning the mat along the right
side of the cutter. Make sure the wheels are aligned with white rectangles on the cutter. (Refer to the
photo below.) The pinch wheels can be slid left and right, as needed. Once they are positioned under
rectangles, drop the levers. Note that only two wheels need to be used for this testing or when cutting most
materials. The left-most wheel(s) can be moved to the far left side and left in the up position.
Wheels should be
located under white Wheels should be
rectangles. located under white
rectangles.
Set origin in front right
corner of paper.
Assemble the pen holder as shown in Section 1.06. Make sure the pen will write by scribbling on scrap
paper. Then loosen the screw on the blade holder seat and insert the pen tool. Make sure the pen nib is
slightly above the cutting surface so that it will not drag across the paper. Firmly tighten the screw.
Refer to Section 1.05 Control Panel for instructions on changing settings. Set the origin by going off-line and
then using the + and - buttons to move the pen over to the front right corner of the paper (thus, most of the
mat and your material are behind the cutter at the start of the cut). Press the Origin button to set the origin.
Press the Online button to return to online mode. NOTE: you must reset the origin every time you turn on
the cutter.
Because the Force and Velocity/Speed can be set in MTC, do not worry about setting the values on the
Maxx Air for now. However, take note of the current settings, to verify that once you do send your first shape
to the cutter, those settings will automatically be changed to match what is in the software.
In MTC, you will set the Virtual Mat to Portrait and make several other settings for doing the tests:
21