Page 21 - Orignal Klic-N-Kuts with MTC User Manual
P. 21
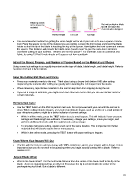
Blade tip needs
to be above the But not too high or blade
material tip will not reach the
material when dropped.
Perfect Height Too Low Too High
One recommended method for getting the same height set for all of your cuts is to use a spacer of some
kind. Place the spacer on top of the material you are cutting. Loosen the front screw and insert the blade
holder so that the tip of the blade is touching the top of the spacer. Now tighten the front screw and remove
the spacer. This distance will provide the blade some “punch room” to give the extra force and more
consistent cutting of your material. What to use for this spacer? For materials such as cardstock and
fabric, try using 13 Post-It note sheets or 6 squares cut from cardstock.
Adjust the Speed, Pressue, and Number of Passes Based on the Material and Shapes
Using correct cut settings is as equally important as the type of blade, blade length, and blade height. Refer to
Sections 2.03 and 2.04 for details.
Keep the Cutting Mat Clean and Sticky
Press your materials evenly to the mat. Think about using a brayer both before AND after cutting.
Repressing the material after cutting can greatly aid in weeding the cut shapes from the waste.
When necessary, tape thicker materials to the mat to keep them from slipping during the cut.
If you cut a range of materials, you might need more than one mat so that you can use stickier mats for
certain materials.
Perform Test Cuts!
Use the TEST button on the KNK to perform test cuts. Do not proceed with your cut until the test cut is
clean. When cutting intricate shapes, a test cut of an intricate image, such as a letter or a small portion of
your rhinestone pattern, might be a better indicator of correct settings.
While in offline mode, press the TEST button to cut a small square. This will indicate if your pressure
settings and blade length are sufficient. If necessary, change your settings, move your origin, and
perform additional test cuts until the material cuts a clean shape.
To simulate multi-pass cutting, repeat a test cut in the same location. This is important for thicker
materials that will clearly require two or more passes.
While in the online mode, pressing the TEST button will cause nothing to happen.
Know Where Your Images Will Cut
Practice with the test pen until you know, with 100% confidence, where your images will be drawn. This is
important since you do not want to be guessing when you begin actually cutting with a blade. Refer to
Section 2.07.
Adjust Blade Offset
What is the blade offset? It is the horizontal distance from the center of the blade shaft to the tip of the
blade. A pen or engraving tool has an offset of 0 because the tip is centered with the center of the
pen/engraving tool shaft. But a blade is different:
21