Page 196 - Orignal Klic-N-Kuts with MTC User Manual
P. 196
It is not necessary to set the origin or even put the printout on the mat in advance of starting the PNC
procedure. Watch this video for a way to make the process a little quicker!
9.06 Print and Cut Scenarios
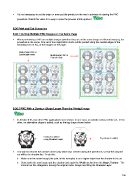
9.06.1 Cutting Multiple PNC Images on the Same Page
When performing a PNC on multiple images (whether they are all the same image or different images), the
procedure is the same. One set of four registration marks will be printed along the outside edges of the
bounding area of ALL of the images on the page:
Multi-image PNC in
Landscape mode Multi-image PNC in
Portrait mode
9.06.2 PNC With a Contour Shape Larger Than the Printed Image
In Section 9.01, two other PNC applications were shown. In one case, an outside contour will be cut. In the
other, an alternative shape is added, such as the tag shape shown below.
Contour is added Tag shape is added
using Shadow Layer
You want to remove the cut line on the cow, which was created during the pixel trace, so that the only line
cut will be the shadow line. To do this:
Make sure the raster image (the cow, in this example) is on a higher layer than the shadow to be cut.
Select both the cow image and the shadow and apply the Weld function from the Magic Toolbar. The
internal cut line disappears leaving the original raster image now filling the Shadow Layer:
196