Page 201 - Orignal Klic-N-Kuts with MTC User Manual
P. 201
At the end of Section 7.13, it was shown how to use node and segment editing to correct the trace line so
that it better fits the original image. Sometimes, however, there may be more editing needed than would be
practical to do. In these cases, an inset cut line can be created. While the same method presented in
Section 9.06.3 could be used, in this case it is desired to have what is called a bleed allowance (a margin of
error for cutting) by allowing the original larger image to still be printed.
Select the traced image and access the Shadow Layer function in any of the following ways:
Click on the Shadow Layer icon on the Magic Toolbar
Press Ctrl+H
Right click on the screen and select Shape Magic>Shadow Layer
Go to Edit>Shape Magic>Shadow Layer.
Select the desired Shadow Width using a negative number so that an inset is created. Note that this is
typically less than 0.03”. Select a Corner Join option and refer back to Section 8.05 for reference. Click on
Accept when done.
Set desired Shadow Width using a negative number
so that an inset shadow is created.
Select Corner Join type.
Click on Accept when done.
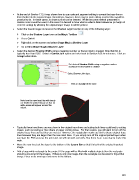
Note how the new inset line will clearly
cut inside the printed image so that no
white areas will appear around the
cutout.
Typically these inset lines are very close to the original trace lines and cutting both lines could lead to cutting
issues, such as tearing or fine slivers of paper coming loose. For that reason, you will want to turn off the
original trace lines so that they are not cut. However, the registration marks are tied to these original trace
lines because they are larger than the new inset lines. If you simply turn off the original printed layer when
you start the PNC process the print and cut will not work correctly. But, there is an easy way to make this
work.
Move the new inset cut line layer to the bottom of the Layers Bar so that it is behind the original imported
image.
Add a large white rectangle to the project. If the page will be filled with multiple objects then the rectangle
should surround all of the images. If there is only one image, then the rectangle can be sized to fit just that
image. Place on its own layer and move to the bottom:
201