Page 204 - Klic-N-Kut User Manual
P. 204
Next, go to File>Print Setup, select the printer you plan to use, and set the Orientation to Portrait:
Select your printer
Verify paper size Choose Portrait
Click on OK when done
Next, go to File>Print Options and mark the following boxes:
Check these three options
Check this option if you want Set to 0 as this does not
an outline only of the arrow apply to KNK cutters.
printed (to save on ink!)
Option to change color of the image outline
Click on OK when done
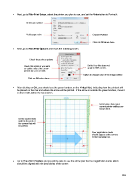
After clicking on OK, you should see the green borders on the Virtual Mat, indicating how the printout will
be placed on the mat and where the arrow will be printed. If the arrow is outside the green borders, move it
so that it falls within the boundaries:
Information about your
current printer settings are
shown here.
Green dashed lines
indicate the part of
the screen that will
be printed.
Four registration marks
should appear at the corners
of the bounding box.
Go to File>Print Preview and you will be able to see the arrow plus the four registration marks which
should be aligned with the boundaries of the arrow:
204