Page 203 - Klic-N-Kut User Manual
P. 203
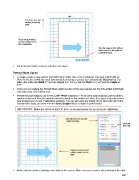
Feed the mat this
direction into the
KNK
Place your printout
on the cutting mat in
this orientation.
Set the origin in the bottom
right corner of the printout,
using the laser.
Go to Section 9.04 to continue with the next steps!
Portrait Mode Option
To begin, create a new custom mat that’s set for letter size or A4 or whatever size your printout will be.
Refer to Section 3.04 if you need instructions for creating a custom mat. Uncheck the Margins box. For
letter size, make the Width 11” and the Height 8.5”. For A4, set the Width to 11.69” and the Height to
8.27”.
Since you are reading the Portrait Mode Option section of the user manual, set the Virtual Mat to Portrait
and select your new custom mat.
What’s the best image to use for the Laser Offset calibration? An arrow is ideal because you’ll be able to
quickly verify if you have the printout correctly placed on the cutting mat. Also, it’s a great shape for seeing
how to adjust your X and Y calibration numbers. You can use most any image, but to follow the rest of the
tutorial more easily, an arrow from the Basic Shapes library is highly recommended:
IMPORTANT: Make the arrow at least 6” high (as shown below) for an accurate calibration.
Mat dimensions should
match printout
Choose
Portrait
Import an arrow and
verify it points to the
right.
Notice that the arrow is pointing to the right on the screen. Make sure your arrow is also pointing to the right.
203