Page 31 - ACS 24-UHF Eagle with MTC User Manual
P. 31
2.09 Important Checklist Before You Cut!
Do you have your material on the mat and the mat inserted into the cutter? (Note: materials with a backing
sheet, such as vinyl and iron-on transfer do not require a mat for cutting)
Do you have the mat under the pinch rollers and the levers lowered in the back?
Have you set the blade length/exposure based on the thickness of the material you are cutting?
Do you have the blade holder firmly mounted in the blade holder seat and the blade tip at the correct height
above the material?
Have you set the origin at the front right corner of your material (or where you need the origin to be)?
Have you set the force? And the velocity?
Have you selected the correct Offset value for the blade you are using?
Do you need to turn on Multi-cut for this material?
Do you know, with confidence, where your shapes are going to cut?
2.10 Calibrating the ACS-24UHF Resolution
Digital die cutters may cut shapes slightly off from the size of the shape in the software. For example, an 8”
x 8” square might cut 7-15/16” x 8-1/32”. Now this might be perfectly acceptable for the type of cutting you
do. Therefore, it may not even be necessary to do this particular calibration. However, if you do want to
make sure your shapes are cut precisely, the following procedure will allow you to calibrate your ACS-
24UHF.
Note that this Resolution only applies to Knife Point and WYSIWYG cutting modes. For Print and Cut
applications, Resolution is determined automatically based on where the registration marks are set with the
laser light during the print and cut process.
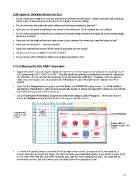
Go to File>Import>From Basic Shapes and select the category called Polygons. Then scroll down to
locate the Square and double click to place the square onto the screen:
A square will
appear on the Select Polygons
screen
Double click on
Square to add to the
screen.
To resize the square, select it and then at the top right of the screen, change the W to, for example, 8
inches. Note that the larger the shape, the more accurate your calibration will be. If you prefer to enter a size
in mm, then enter 200 mm, but enter it just that way, with the “mm” following the 200. The value will be
converted to inches, but not to worry: you can still perform the calibration in mm.
31