Page 29 - ACS 24-UHF Eagle with MTC User Manual
P. 29
Place several scraps (large enough for the shape on your screen) on your mat in different locations, as
shown below.
Insert the mat into the ACS-24UHF and then set the origin at the lower right corner of one of the scraps
and cut the currently selected shape.
Move the pen to the bottom right corner of the next scrap and set the origin there and cut the same
shape (or another shape, depending on what you have on your virtual mat). Repeat for other scraps.
Note the red “X”’s indicate where the origin would be set so as to not cut off the scrap:
Feed the mat this
direction into the cutter
WYSIWYG
This is the mode recommended when you need to cut shapes in very specific locations on your material
(such as the center front of a greeting card).
Create a virtual mat that matches the material dimensions. For example, if you are cutting from an 8.5” x 11”
sheet of cardstock, then create a Virtual Mat with those same dimensions. You can use either Portrait or
Landscape mode - just remember to place your material on the mat in the correct orientation for feeding
into the ACS-24UHF.
The origin is set using the laser light, not the blade tip. Go Offline, press the Menu button and then press
the Origin button. Direct the red dot of the laser light to the bottom right corner of your material (see
below). Note that if you need absolute precision for the location of your cuts, it will be necessary to calibrate
the Laser Offset, which is covered in Chapter 9.
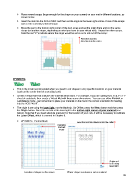
WYSIWYG– Portrait Mode
Feed the mat this direction into the cutter
Indicates
Portrait
mode
Origin set
here using
laser light
Location of shapes on the screen Where shapes are drawn or cut on material
29