Page 30 - ACS 24-UHF Eagle with MTC User Manual
P. 30
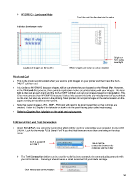
WYSIWYG – Landscape Mode
Feed the mat this direction into the cutter
Indicates Landscape mode
Origin set
here using
laser light
Location of shapes on the screen Where shapes are drawn or cut on material
Print and Cut
This is the mode recommended when you want to print images on your printer and then have the ACS-
24UHF cut them out.
It is similar to WYSIWYG because shapes will be cut where they are located on the Virtual Mat. However,
in the Print and Cut process, three printed registration marks are printed along with your images. The laser
light is then set at each mark and the ACS-24UHF will then cut out your shapes based on triangulation. This
is far more precise than WYSIWYG because it takes into account not only any misalignment of your printout
on the mat, but also any errors in the printing. Most printers do not print images in the same location on the
paper as they are located on the screen.
Note that raster images (.JPG, .BMP, .PNG etc) will need to be pixel traced first so that cut lines are
created. Refer to Chapter 6 for tutorials on how to do the pixel tracing (also called vectorizing).
Refer to Chapter 9 for tutorials on the print and cut process.
2.08 Serial Port and Test Connection
Under Serial Port, you select the connection which will be used for connecting your computer to your ACS-
24UHF. Look for the words “USB Serial Port” if you find that there are more than one listing in the drop
menu:
ACS is assigned
to COM 7 This is not the
connection between the
computer and the cutter
The Test Connection button can be used to verify that your computer is communicating properly with
your ACS-24UHF. Pressing it should cause a small movement of your blade carriage.
Click here to test communication
30