Page 11 - ACS 24-UHF Eagle with MTC User Manual
P. 11
1.06 Blades and Accessories
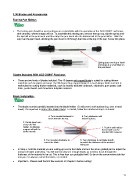
Testing Pen Holder:
The testing pen should be used until you are comfortable with the operation of the ACS-24UHF and know,
with certainty, where images will cut. To assemble this testing pen, remove the top cap, slip the spring over
the top half of the pen insert and then drop the pen insert into the bottom half of the pen holder. Slide the
cap over the pen insert, allowing the pen insert to fit through the hole at the top of the cap. Screw into place.
Spring goes over top of insert
and stops at a small ridge on
the pen insert.
Blades Included With ACS-24UHF Purchase:
There are two kinds of blades included: The 45 degree red capped blade is suited for cutting thinner
materials such as paper and vinyl. The 60 degree blue capped blade is a much longer blade and and is
well-suited for cutting thicker materials, such as heavily textured cardstock, chipboard, gum paste, craft
foam, poster board, and rhinestone template material.
Blade Installation:
The blade must be carefully inserted into the blade holder. Do this over a soft surface (e.g. over a hand
towel). It’s important to protect the fragile blade! To install, follow the numbered steps as shown:
Step 1. Push
4. Turn counterclockwise to 6. Turn clockwise until inwards so that
move towards the top. locked in place. blade can be
2. Gently insert non- inserted.
sharp end into
holder. An internal 1. Push in and hold so
magnet will pull the that a blade can be
blade inwards. inserted OR removed.
3. Turn counter-clockwise to 5. Turn clockwise to set blade length
retract the blade. to match the thickness of the material
being cut.
In Step 5, hold the material you are cutting up next to the blade and turn the silver gridded part to adjust the
amount of blade protruding. You will want to only see enough blade, as needed, to cut through the
thickness of the material to be cut. This is less than you probably think! So be on the conservative side first
and you can always extend the blade, as needed.
Important – Please read the first few sections of Chapter 3 before cutting!
11