Page 188 - Orignal Klic-N-Kuts with MTC User Manual
P. 188
9.03 PNC Procedure Part 1: Setting Up and Printing
What do you need before you begin a PNC?
First, you need an image to print, a printer, the test pen, and the blade holder.
You need to be well rested! You don’t want to start learning the PNC process when you are tired,
stressed, or in a hurry. Mastering a PNC comes when you have the time to repeat it about 4 times in a
row. At that point, you will have repeated the process enough times to feel very comfortable with the
order of the steps and then be ready to do future PNC’s quickly and with ease.
IMPORTANT: Do not use high speeds when performing very
precise PNC’s. Set the cutting Speed to 200.
While it is possible to do PNC’s in either portrait or landscape mode, it is highly recommended that you
select the same orientation you typically use for your other cutting in MTC. If you prefer to work in portrait,
please skip to the Portrait Mode Option section following the Landscape Mode Option section.
Landscape Mode Option
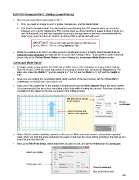
To begin, create a new custom mat that’s set for letter size or A4 or whatever size your printout will be.
Refer to Section 3.04 if you need instructions for creating a custom mat. Uncheck the Margins box. For
letter size, make the Width 11” and the Height 8.5”. For A4, set the Width to 11.69” and the Height to
8.27”.
Since you are reading the Landscape Mode Option section of the user manual, set the Virtual Mat to
Landscape and select your new custom mat.
Open your PNC project file. In this tutorial, a simple arrow from the Basic Shapes library has been chosen.
It is recommended that you select something rather basic while learning the process. Pay close attention to
orientation of the shape on the mat, as shown in the following steps.
Mat dimensions should
match printout Choose
Landscape
Import an arrow and
rotate to face upwards
Notice that the arrow is pointing upwards on the screen. Make sure your arrow is also pointed upwards!
Later, when you print the arrow and place the paper on the mat, the arrow will be pointing to the right as you
insert the mat into the KNK.
Next, go to File>Print Setup, select the printer you plan to use, and set the Orientation to Landscape:
Select your printer
Verify paper size
Choose Landscape
Click on OK when done
188