Page 227 - Klic-N-Kut User Manual
P. 227
paper/cardstock, then a lower force can be used, but you may still need several passes. Also raise the tool
in the blade holder seat the same way you do with the blade holder, to get more force invoked.
Remember to turn off the Blade Offset setting when scoring or embossing but turn it back on when you get
ready to cut.
When embossing paper or cardstock, it is recommended that you use the Shadow Layer function to create
a very small outline and inline, say 0.01”. These tiny offset lines will then produce a slightly thicker overall
outline of your shapes. This works better than fill embossing which can stress the cardstock and cause
wrinkling. Here are the steps:
th
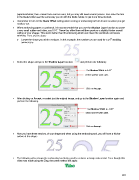
Create the shape you wish to emboss. In this example, the numbers 25 are used for a 25 wedding
anniversary:
Select the shape and go to the Shadow Layer function: and perform the following:
Set Shadow Width to 0.01”
Select Corner Join style.
Click on Accept.
After clicking on Accept, re-select just the original image, and go to the Shadow Layer function again and
perform the following:
Set Shadow Width to - 0.01”
Select Corner Join style.
Click on Accept.
Now you have three versions of your shape and when using the embossing tool, you will have a thicker
outline of the shape:
The following video shows the embossing tool being used to emboss a design onto metal. Even though this
video was made using the Zing, the same method will apply:
227