Page 221 - ACS 24-UHF Eagle with MTC User Manual
P. 221
There is a drop-in Engraving Tip for the original silver blade holder or the ACS-24UHF blade holder, or you
can use the Zing Engraving tool in the ACS-24UHF.
The same basic guidelines apply to engraving as in embossing and scoring:
You will probably need to use the WYSIWYG cut mode.
You will need to turn off the Blade Offset setting for engraving.
You will probably need to use multiple passes to get the desired results.
On softer metals, you may not want the engraving tip too far above the metal as it can leave a pock mark
when it drops to start engraving. If possible, test on scraps first.
Refer to the Suggested Settings table at the end of this chapter or force and speed settings on various
materials. Note that you can engrave on materials that cannot be cut on the ACS-24UHF, such as jewelry
charms, dog tags, and trophy plates.
The open path fonts available in MTC should work well for engraving. They contain single path lines and
curves versus outlines and are usually more desirable when engraving letters. Refer to Section 5.11.
Project: Engraving a Dog Tag
When engraving items that are already cut (such as the items listed previously), it can sometimes be tricky
getting the perfect alignment you need. Here’s a method that works well (thank you to Michelle Hessler for
posting this technique):
Carefully measure the dimensions of the item. For example, it if is a circular dog tag, then measure the
diameter. Recreate the shape in MTC and size it to be the same. In the follow example, the diameter of
the dog tag is 1-1/8”, so a circle of the same size is drawn:
Photo of actual Circle created in MTC at the
dog tag same diameter as the tag
Because this shape will be cut from another material to use in the alignment process, the shape is
resized to be a tiny bit larger. For a circle, you can simply resize it in the Sel Properties Bar. If the
shape is something non-symmetrical, then use the Shadow Function with a Shadow Width of about
0.04”.
Next the desired lettering and/or shapes are added. In this case, the dog’s name and a phone number
with “Please Call” are chosen. Because there is also a hole near the top of this dog tag, a ¼” high
square is added just to show the top limit of where the lettering could be located. This is deleted as soon
as the lettering is added and positioned:
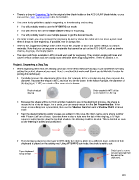
The lettering is placed on one layer in MTC while the circle is place on a different layer. A sheet of thin
chipboard is placed on the cutting mat. Using WYSIWYG cut mode, the circle is sent to cut:
Tape chipboard Circle layer is sent to
to top of mat cut and removed from
the rest of the
chipboard.
221