by Sandy McCauley | May 30, 2008 | Breaking Path, Grouping, Making Path, Ungrouping
As promised, I pondered about real life examples that might help users better understand Grouping versus Making Path. My first thought was Fruit Salad versus a Smoothie… but then I realized that with a Smoothie, you cannot go backwards and extract the individual pieces of fruit back out of it! lol
So, I pondered some more and come up with the following analogy, which I think is pretty cool. 😛
Grouping is like a car pool where you put various people together into a vehicle for the purpose of moving them together from Point A to Point B, BUT those people are still very much individuals from different locations each with their own purpose and priorities. And so, with grouping, the images retain their color and their original format… even raster images remain raster. When grouped you simply can move them as one, rotate, resize etc.
Making Path is more like a sports team where individuals come together, they wear the same uniform (become the same color) and there’s a bigger purpose for them to be together. They perform in unison. Making Path on selected vector images will make them all the same color, convert them all to polyarc or polygon, the nodes for all will show up at once when selected, and if you send then to cut, along with other objects, all of the objects in that “Make Path” group will be cut together before or after other objects.
Does this help?
by Sandy McCauley | May 30, 2008 | Breaking Path, Grouping, Making Path, Raster, Ungrouping, Vector
Thanks to Kathy TwoBears for today’s subject. Great suggestion, Kathy!
In Klic-N-Kut Studio, the difference between Grouping and Making Path can be very fuzzy for most new owners. I even had to get Chad Youngblut at Accugraphic to explain it to me, in detail, early on in my KNK Studio mentoring. Rather than try to explain it in technical terms, he simply provided a few examples to me over the phone and suddenly, the light bulb came on!
Before I begin explaining the differences, remember that a vector image is an image made up of nodes, connected by lines or curves, and these are the required kinds of image for cutting. A raster image is made of thousands or millions of little squares of various colors, like a photograph. A raster image must be traced first, so that there is a vector image to send to the cutter. So now, onto the subject of today’s post…
Applying Layout>Group on two or more objects means:
- KNK Studio still sees them as individual objects, but will have them “linked” together. Thus, when you click on any one image in a group, ALL of the images are selected and you can move them, resize them, rotate them, etc, as one object.
- If the images are different colors, then grouping them WILL retain those assigned colors.
- You can group a raster image with a vector image. This can be very useful with Print and Cut projects where you want to make sure the two images stay perfectly aligned.
- In KNK Studio, you can have layers of grouping. For example, if you have three images: A, B, and C, you can group A and B first. Then group A/B with C. When you then select Layout>Ungroup, the result will be that A and B are still grouped and C is separated. You need to then go to Layout>Ungroup again to separate A from B. This is a VERY useful feature in the software!
Applying Arrange>Make Path on two or more objects means:
- KNK Studio sees them as ONE object. Double clicking on the image will bring up the nodes for ALL of the paths for the images, even though they are made up of separately closed paths on their own. A great example is to type a letter “B”, go to Arrange>Text to Graphics, and then double click. You’ll see the nodes for the exterior path of the “B”, as well as the two interior paths. However, if you double click on grouped objects, this causes the Group Viewer window to open, rather than seeing the nodes. This tells you immediately that if you wish to view the nodes, then you must ungroup those objects and then double click on just one of the objects.
- If the images are different colors, then Arrange>Make Path will cause all images to become the same color…. which color will be selected, amongst the choices from each object, is yet for me to determine! I think it’s whichever color is assigned to the earliest object created amongst the ones selected… but does it really matter? If you don’t like it, change it! lol
- You cannot do an Arrange>Make Path with a raster image included in the selection of images. This option will be grayed out if you try to include the raster image.
- There are no “layers” of making path. Again, let’s go back to images A, B, and C. If you do an Arrange>Make Path on A and B and then do the same on A/B and C. Then when you do Arrange>Break Path, all of the paths immediately become individual paths.
Now, perhaps I’ve just made this MORE confusing rather than LESS? If so, don’t fret, I will address this again after I have a chance to sleep on it and maybe think of some great analogy outside KNK Studio. 🙂
by Sandy McCauley | May 28, 2008 | Toolbars
Customizing your toolbar is a way to make your KNK Studio experience even better. I have several functions that I like having readily available, but be sure to think about what YOU might find handy, rather than just copying my list. Further, my list are all functions that are NOT already available in other toolbars, however YOU might prefer to create a single toolbar that contains those icons from the other toobars that you use most often so that you only have a single toolbar on your entire KNK Studio screen. This will reduce clutter and provide a larger working area for you to view your images.
Before listing my favorites, note the procedure for creating a customized toolbar:
- Go to View>Toolbars>Customize. Note that at the bottom of the popup window, you can check a box to make all of your icons larger. I have this checked primarily because I want them to stand out in my videos. But it’s also nice for anyone who strains to see the icons on the screen.
- Click on New and give your toolbar a name. Click on OK.
- A new window will open and you will see all available icons on the left side. Simply pick an icon and click on Add. The icon will be added to the right side. If you change your mind, select it on the right side and click on Remove.
- You can add pale gray divider lines by clicking on Separator at the top of the list and adding.
- You can change the order of our icons by selecting one on the right and then clicking on either Move Up or Move Down to change its relative location.
- When you are done adding icons, click on Close, make sure your new toolbar is checked and then click on Close again. Your new toolbar will appear at the top of the screen and can be moved to your preferred location.
- Finally… and this is VERY important: go to View>Toolbars>Save and save your current configuration. Customized toolbar setups have been known to suddenly vanish and need to be recreated! But if you have saved your configuration then you can go to View>Toolbars>Load to retrieve it in case this happens.
And now for my favorites:

- Remove All Guides: a quick way to delete all guidelines in one click
- Convert to Polyarc: I love the editing functions in Polyarc mode and find myself converting to polyarc frequently.
- Contour Object: another way to create an outline mat: this one has the ability to ignore the interior parts of letters in a title.
- Outline: the other way to create an outline mat: I keep this one handy since it can create multiple outlines, as well as inlines.
- Zoom to Selected Object: absolutely essential for any kind of editing… you always want to zoom in on your individual objects.
- Zoom to Sign Blank: also essential so that you can quickly go back to see your entire document area.
- Notes: I tend to use this rather frequently in tutorials and videos, so it’s nice to have it right there on a toolbar.
Again, it’s up to YOU to figure out what you most need in your toolbars. And don’t forget to save it once you create it. 🙂
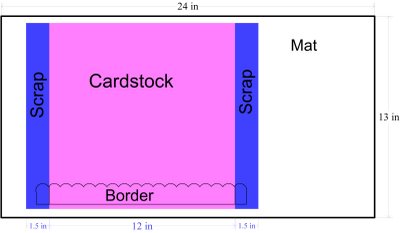
by Sandy McCauley | May 26, 2008 | Borders

While digital die cutters can do some very intricate cutting, it can be difficult to cut a precise 12″ border from a 12″ long sheet of cardstock. However, here’s a method that insures you get a complete border cut from your cardstock every time.
Before I get started on the method, note that the dimensions used are for a Klic-N-Kut. However, the exact same process will work with any other cutter. Just realize that you do need a mat at least 15″ in length.
In KNK Studio, create a Sign Blank that is ~13.5 – 14″ in length. The width can be whatever you like, just as long as it’s wider than the width of your border. 🙂 Create your border to be 13″ long. Now, depending on which cutter you own, you may need to switch to Landscape mode by either using Axis Swap or changing under Layout>Sign Blank or by rotating your image. This tutorial assumes you already know how to cut front to back, versus left to right with your particular cutter in the KNK Studio software.
Place a strip of scrap cardstock (shown as blue above) at the start of your mat, then align your 12″ long good cardstock (shown as pink above) next to the scrap, followed by another scrap (again, shown as blue). The plan here is to start the cut on the first scrap, continue the cut through the good cardstock and then end on the other scrap.
When you are ready to cut your border, make sure your blade origin is over the first scrap and ~1/2″ from the start of your good cardstock. Work in Page mode (Cut>Plotting Defaults, change from Sign Blank to Page and click on Save Defaults or it can be turn on in the Cut Preview window (fourth icon from the right). This tells the cutter to start the image at the set origin.
Then click on the Scissors to cut and you should have your 12″ border. As always, you might want to test draw with your pen holder first just to make sure you have the steps down pat! 🙂
by Sandy McCauley | May 23, 2008 | Extend, Free Videos, Polyarc, Trim
Today, I was asked about the purpose of Trim and Extend in the Polyarc editing window in KNK Studio. Well, these two functions are VERY cool… when they work! I have found simple cases in which they serve their intended purpose which is to trim (shorten) paths to meet at their intersection OR to extend (lengthen) two paths to intersect.
I created a quick video (sorry, no audio) TrimandExtend a while back to show a customer how these functions work and you can download the same Trim and Extend Samples file I’m using in the video from Trim and Extend Samples. Note in the video that I’m simply left clicking once on each path as shown. In the second part of the video, I found that I needed an extra node on that triangular path for the trim to work. And I needed to convert it to a polyarc, as the polygon editing window doesn’t contain Trim and Extend functionality. Anyhow, while these functions work perfectly in these particular simple samples, you may get some weird results when you try using it in other situations! But you can also resort to other methods to achieve the exact same results! 🙂


